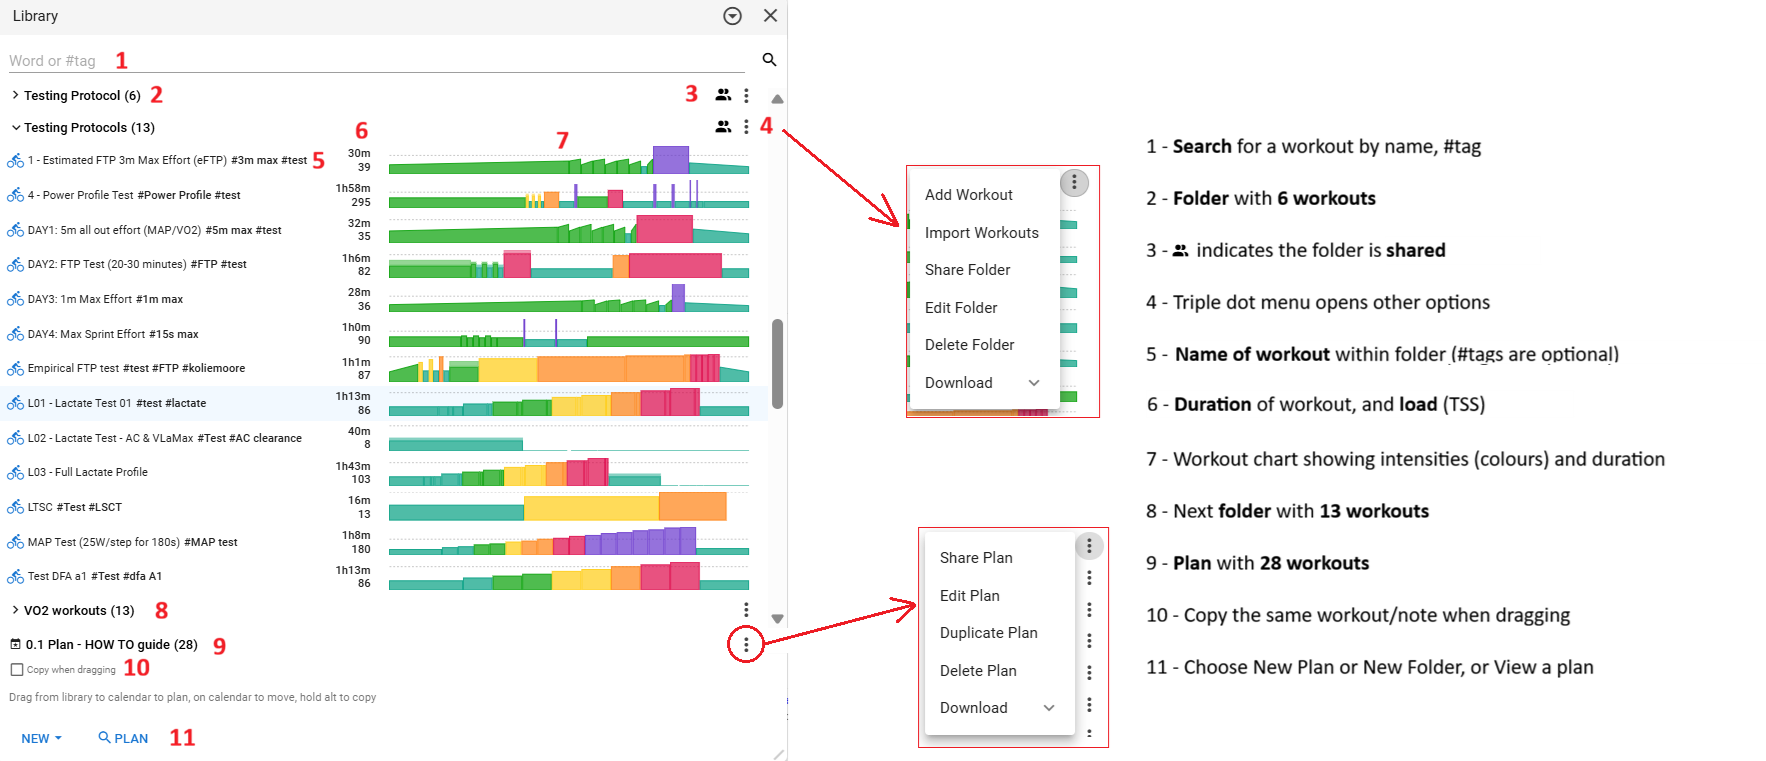
Section 16
Workout Builder basics
There is a thread dedicated to the Workout Builder, but has a lot of comments in-between the vital information. This section will touch briefly on the basics:
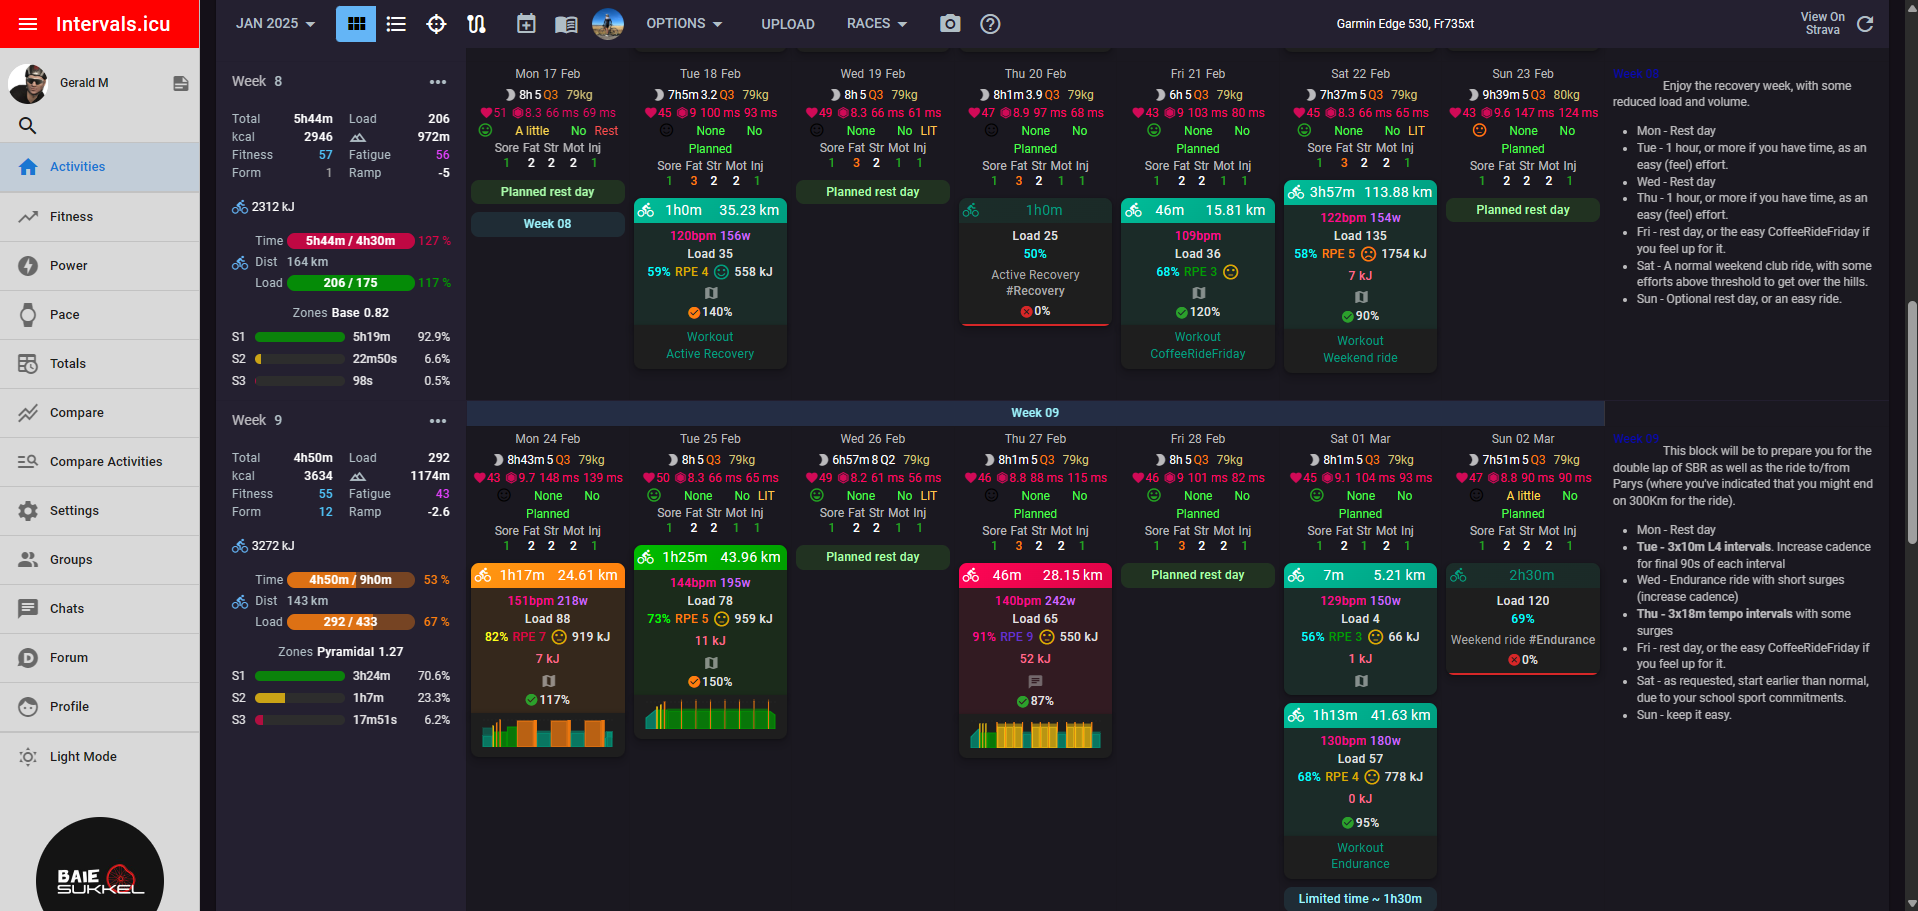
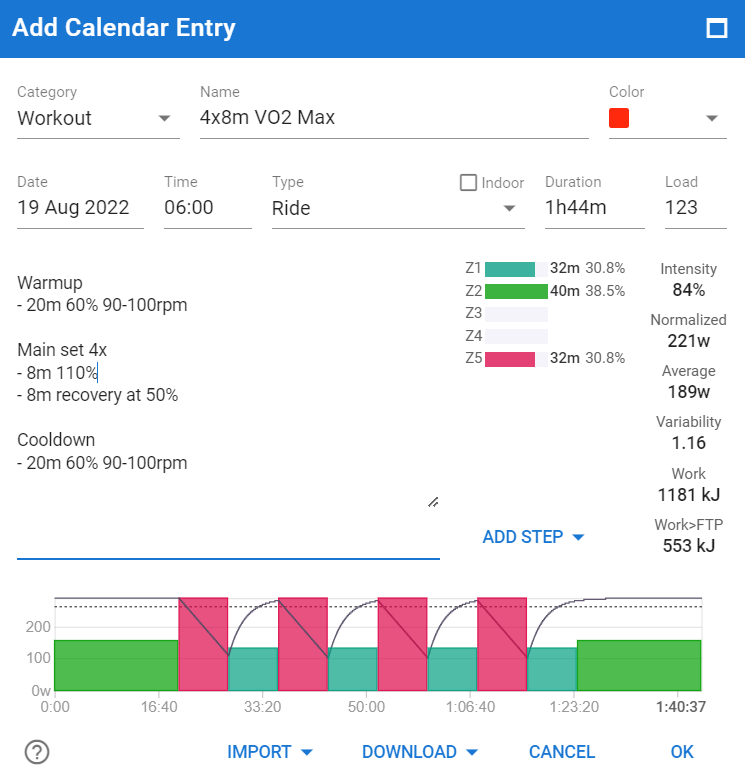
Before starting, let’s understand what is displayed once the workout is ready to be saved.
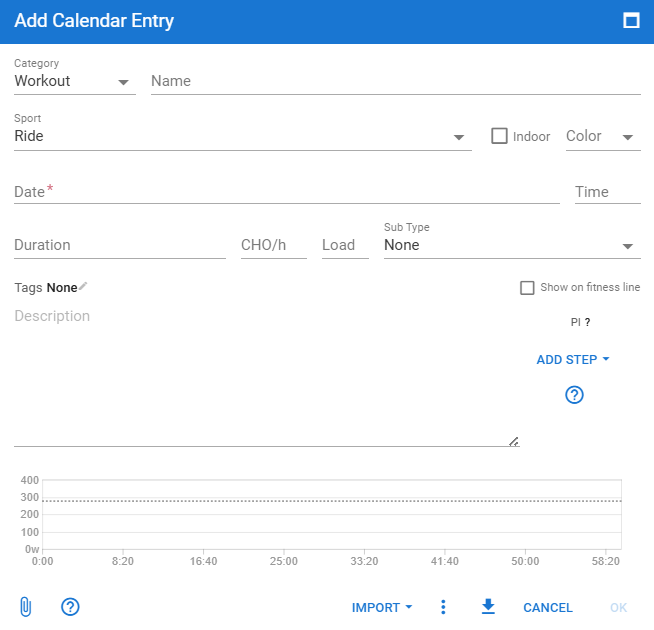
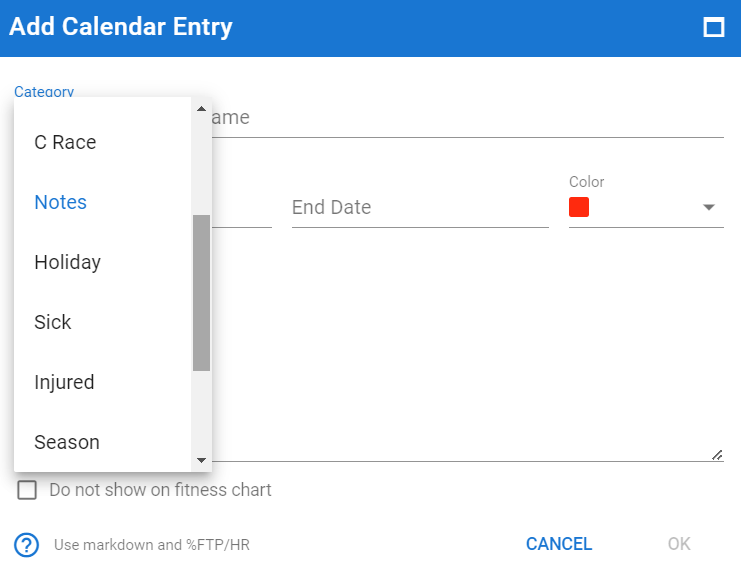
- Category: Chose from Workout, Manual Activity, A-B-C Race.
- Name: 4x8m VO2 Max, can be anything you want** - this is a mandatory field.
- Colour: Red default is red, but you can select from a list of colours.
- Date: 19 Aug 2022, today’s date, or select a date if you’re working on another workout.
- Time: 06:00, useful when doing more than more than one workout per day**.
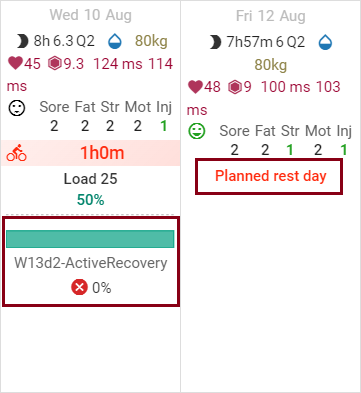
- Duration: 1h44m, an optional field; can be calculated if using the description field below**.
- Load: 123, an optional field; can be calculated if using the description field below**.
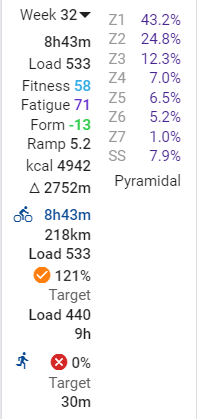
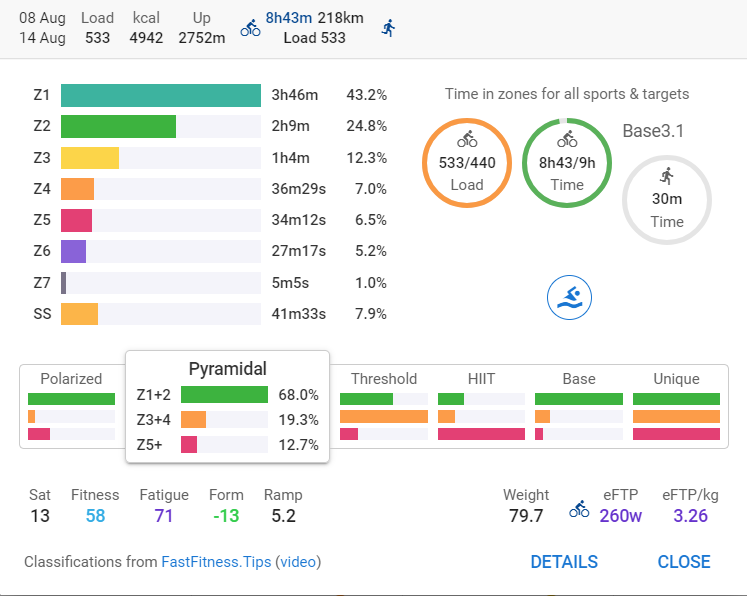
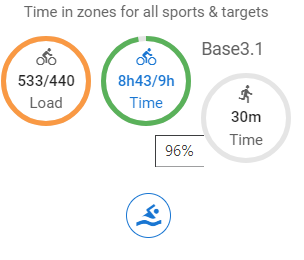
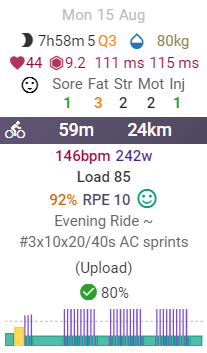
- Description: Custom text, duration, intensity, cadence, etc will show in the graphic at the bottom of the pop-up menu
- Time in Zone (TIZ): if Power/HR and Duration is used, it will show the TIZ to the right:
- Z1: 32m (30.8%)
- Z2: 40m (38.5%)
- Z5: 32m (30.8%)
- Intensity: 84% (complex formula used to calculate this number).
- Normalised: 221W, is the planned Normalised Power for the workout**
- Average: 189W, is the planned Average Power for the workout**
- Variability: 1.16, is the planned Variability (NP/AP) for the workout**
- Work: 1181kJ, is the amount of total work done (1kJ = 1000Ws).
- Work>FTP: 553kJ, is the amount of work done above the set FTP.
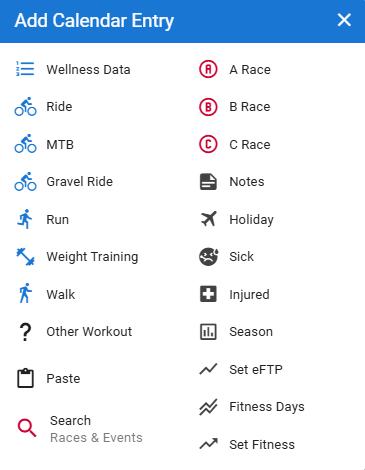
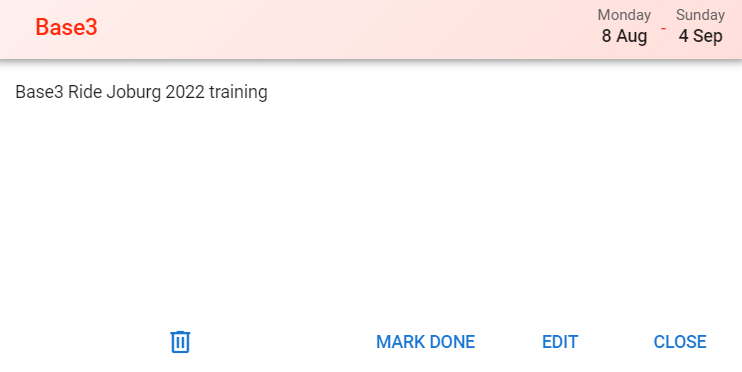
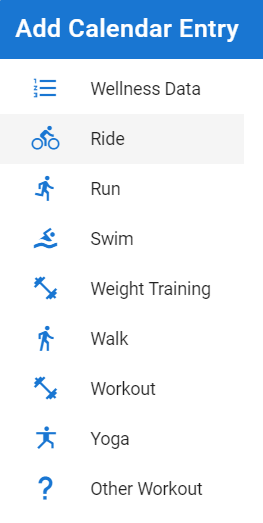
Click on the day for the chosen activity, then select the workout type, eg. Run, Ride, Swim, etc.
HEADER SECTION
Enter the workout description, eg. 4x8m threshold
The colour can change based on your preference.
The date can be changed if you clicked on the wrong day when adding the entry.
An optional time can be used
Type: Ride, Run, Virtual Ride, Swim, etc.z
Duration and Load can be entered here, if known, or the steps in the next section can calculate it for you.
WORKOUT SECTION
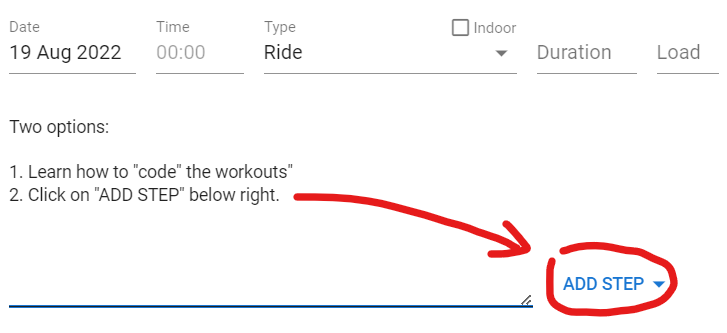
There are two ways to build a workout:
- Learning the code/lingo used
- Using the ADD STEP method
WORKOUT SYNTAX - Updated on 06/01/2025
*Workouts need to be in the same unit of measure, eg. all power, all HR, all pace, and not a mix of units. Additional information can be added, eg. text, duration, intensity and cadence (optional).
Clicking on ADD STEP opens a user-friendly prompt, which is divided into 10 sections. The category will be Workout (default setting):
A detailed description of each follow this, and the example of one line of text.
- Interval Type
- Duration
- Distance
- Target control is Power
- Target control is HR
- Target control is Pace
- Target control is Cadence – this would complement power, and not standalone.
- Power type (% of FTP/MMP, absolute, or a range of each option)
- Custom Text
- Intensity description (warmup, active, interval, cooldown)
The combination of these options (listed above) will show in the Description area of the calendar entry.
-
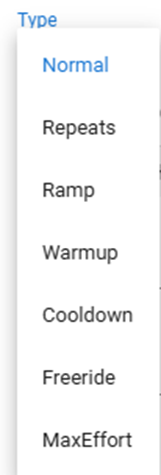
TYPE OF INTERVAL – select from these options. This applies to Power, HR and Pace:
a. Normal – the default setting, eg. 10m 40% (power) and 10m 40% HR (heart rate).
b. Repeats – adds the line 2x, 3x, 4x, etc. 3x repeats
c. Ramp – a gradual increase from one value to another value, eg. 40-70% (of FTP), or Z1-Z3 HR (of maxHR).
d. Warmup – adds the word warmup, plus and duration, intensity and text.
e. Cooldown – adds the word cooldown, plus any duration, intensity and text.
f. Freeride – when a prescribed power level is not required, eg. the 20-mins of the traditional 20m FTP test. Think of the Zwift test, where there is no power guiding you along. Similar for HR, where a target is not necessary.
g. MaxEffort – used to indicate an all-out effort that might not have a target value set, but rather indicative.
-
DURATION
Expressed in three units or time, namely:
a. h = hours
b. m = minutes
c. s = seconds
The format can be written as a singular unit only, or as multiple units, as the examples below show:
• 45s = 45 seconds
• 90s = 90 seconds
• 1m30s = 1 minute and 30 seconds (which is also 90 seconds)
• 90m = 90 minutes
• 1h30m = 1 hour and 30 minutes (which is also 90 minutes)
-
DISTANCE
a. Can only be used in Km
b. Used in conjunction with Pace (please correct me, if wrong, as I don’t use this field).
4-7. Unit of measure need to be the same, eg. all power, or all HR, from the following options:
-
POWER
When using Power, there are ways to measure the power relative to a known value/range, eg. %FTP (80%), %FTP range (Z1-Z2):
a. None – lists as the duration entered, eg. 5m
b. % FTP – a fixed % of your FTP, eg. 80%
c. %FTP Range – a range of % of your FTP, eg. 70-80%
d. Zone – Z2
e. Zone Range – Z1–Z2
f. %MMP – a fixed % of the MAP value on the Power page, eg. 100%
g. % MMP Range – a range of % of the MAP value on the Power page, eg. 90-100%
h. Watts – a fixed value, eg. 300W
i. Watts Range – a range of watts, eg. 295–305W
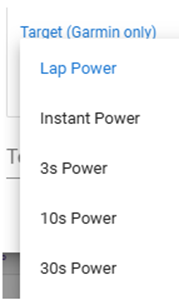
Once selected, there are a number of sub-options (targets) to choose from, depending on the unit of measure selected, eg. using target power (Garmin only) has these options:
• Lap Power is the lap average, and has no specific text. It changes when a new lap is activated.
•
power=1s Instant Power (current power, that changes every second)
•
power=3s Power (3 second average)
•
power=10s Power (10 second average)
•
power=30s Power (30 second average)
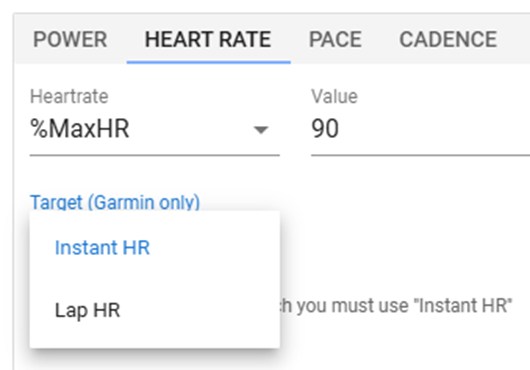
- HEART RATE
When using Heart Rate, there are ways to measure the HR relative to a known value/range, eg. %LTHR (Lactate Threshold Heart Rate), %MaxHR (Maximum Heart Rate). These need to be setup in settings, if not already done:
Note: When using HR as the target, it has to show HR or LTHR after the options (below), otherwise it defaults to Power, eg. 80% HR is 80% of maxHR, and 80% LTHR is 80% of LTHR.
a. None – lists as the duration entered, eg. 5m
b. % MaxHR – a fixed % of your maximum HR, eg.
80% HR
c. %MaxHR Range – a range of % of your FTP, eg.
70-80% HR
d. %LTHR – a fixed % of the LTHR value on the Settings page, eg
100%
e. %LTHR Range – a range of % of the MAP value on the Settings page, eg.
90-100%
f. Zone –
Z2 HR
g. Zone Range –
Z1–Z2 HR
Once selected, there are two sub-options (targets) to choose from For Garmin only), which is Instant HR (beat by beat change) or Lap HR (average for the current lap.
-
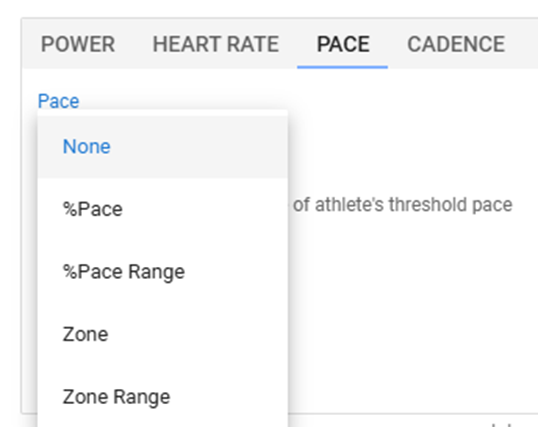
PACE
When using Pace, there are ways to measure the Pace relative to a known value/range, eg. %Pace (80%), %Pace Range (80-90%). These need to be setup in settings, if not already done:
a. None – lists as the duration entered, eg. 5m
b. %Pace – a fixed % of your threshold pace eg. 80% Pace
c. %Pace Range – a range % of your threshold pace, eg. 80-100% Pace
d. Zone – a fixed zone (as per your pace settings on the Settings page), eg. Z1
e. Zone Range – a zone range (as per your pace settings on the Settings page), eg. Z1-Z2
-
CADENCE
a. Used in conjunction with Power (cycling) as a target cadence value.
b. RPM is the unit of measure, i.e. revolutions per minute.
c. Can be one value, eg. 100rpm or a range, eg.100-110rpm
-
INTERVAL INTENSITY – each selection (4-7, above) has sub-options to choose from.
-
Custom TEXT you can display on the device (GPS) or on screen, eg. Zwift, TP Virtual, etc.
Example = high cadence, low force
-
INTENSITY - select from the list,or use Auto (default):
a. Auto (doesn’t show intensity=xxxxx)
b. Active, intensity=active
c. Interval, intensity=interval
d. Rest, intensity=rest
e. Recovery, intensity=recovery
f. Warmup, intensity=warmup
g. Cooldown, intensity=cooldown
h. Other, intensity=other