This is a follow-up post regarding intervals in Intervals ![]()
Getting your intervals from an activity can be done in several different ways:
- Intervals can detect efforts in a data-stream following an algorithm. This is in fact how Intervals started out at the very beginning, hence its name. Efforts can be detected from Power, HR, pace. This is an automatic process and the algorithm will in most cases find intervals from a single uninterrupted stream of data. This can look a bit chaotic if you analyse a group ride or race.
- You can set Intervals to not automatically search for intervals, but to follow ‘Lap’ events. A Lap-event is logged by your device whenever you press the Lap button. Structured workouts also create Lap-events in your activity file, if the workout runs on the same device. So these Lap-events are user-defined and/or driven by following a structured workout.
- A very recent addition is to have Intervals use the Lap events from a planned workout that is coupled to your activity. This is great functionality if you use dual recording. Zwift workout for example that is also recorded on a Head Unit that allows recording of advanced metrics like RespRate/Alpha1/Left-Right power balance… In most cases you will run the workout on Zwift and have a Garmin/Wahoo/Suunto… record the advanced metrics. Unfortunately, your device is not logging the Lap-events in that case. But now you can plan a Zwift workout, execute and dual record it, then couple the activity from your head-unit to the planned workout and get Lap-events from the planned workout.
- You can instruct Intervals to look for specific intervals, with a specific power range and a specific duration. You can for example look for 6 intervals of 6 minutes at 110% FTP in case you did a VO2 workout where no laps were logged.
- You can off course create intervals manually. This also allows you to edit any of the above auto/semi-auto created intervals.
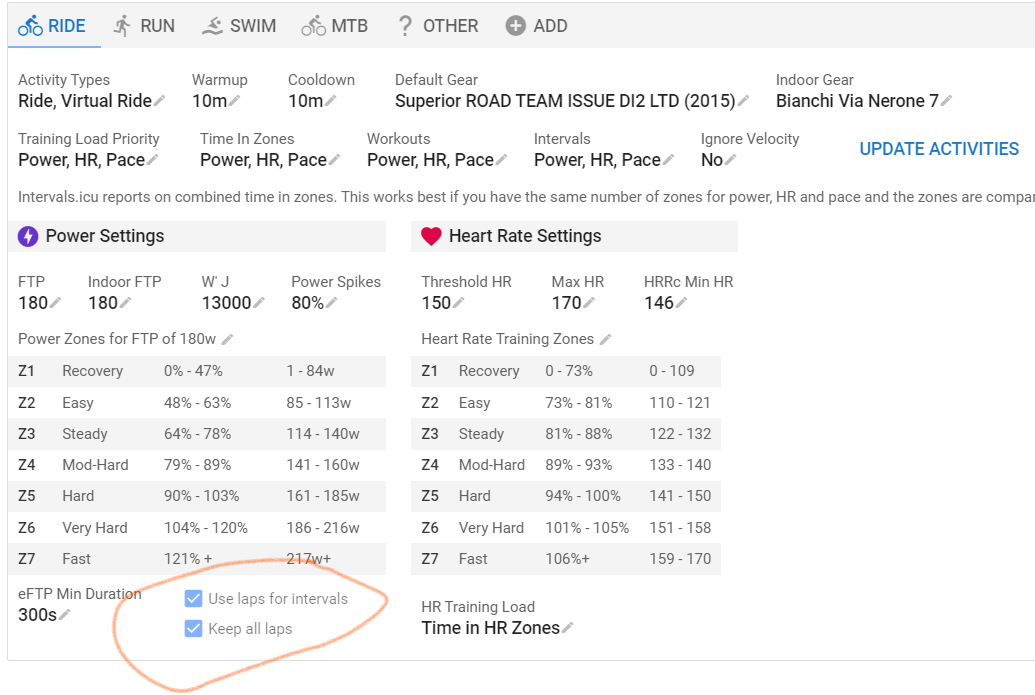
In settings, for each category, you have 2 checkboxes, ‘Use Laps’ and ‘Keep All Laps’. If you enable Use Laps, Intervals will not auto-detect and follow Lap-events in your activity. The ‘Keep All Laps’ will make sure that ‘weaker’ recovery/rest intervals, will also be logged as an interval. If you keep it unchecked, a weaker range in between two efforts, will not be considered an interval. So these checkboxes define what Intervals will do with a new activity coming in by default. If you don’t like the result, you can go to the Actions menu – Analyse and you will get a chance to change the detection method. Actions-Analyse can be done at any time, so the best way of learning what’s described in this post is to try all methods on a single activity and see which method is best for your use-case. The first three methods above can be chosen from the Analyse dialog.
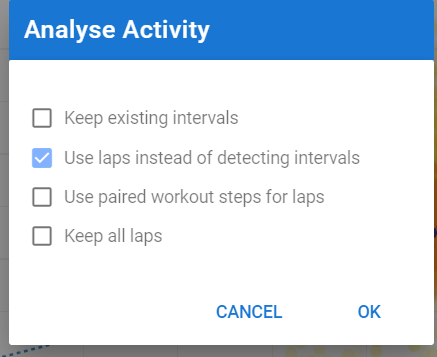
Actions-Find intervals is the menu option that will let you do as described in nr 4. Just play with it to see how it works.

Creating and editing intervals manually is done by use of mouse and/or keyboard. Positioning the mouse cursor in the active chart area and click-drag or hitting certain keys on the keyboard, will let you do that. The A-key will create (add) an interval at the mouse position. To make it longer/shorter, just drag the edge(s). Positioning the mouse cursor over an existing interval and hitting the D-key, will delete that interval. With the S-key, you can split that interval, at the position of the mouse cursor. The M-key will merge the interval where you’re positioned with the first one that is further to the right. Another way of merging intervals, is to drag the edge over the start/end of the adjacent interval. That will merge them.
And last one, from the data table with all intervals, you can click on the ‘label’ and adjust things with numbers. Or, another very interesting option, you can split one big interval in multiple equal smaller intervals. Or you can instruct Intervals to create a new interval every km/minute…
Learning the above manipulations and combining them gives you a lot of possibilities to get the intervals exactly like you want with less effort.