ACTIVITIES PAGE - a guide to getting started

Section 6
Ask a coach for help

image

This option opens a pop-up for you to contact affiliated coaches.
image

2 Likes

Section 7
Options

Quite a lot of features here, so updated posts will be required.

  1. Search for activity
    Allow you to search for activities by the activity name, eg. Temp will list all tempo workouts.
    image

  2. Clicking on CSV allows you to download all activities

  3. Normal, Compact or Minimal
    Allows you to change the amount of information displayed on the Activities page.

  1. Colors | Wellness | Weather
    Drop down options reveals additional information and options
    This will be covered in specific posts

  2. Tick boxes
    This allows you to show/hide information on each day on the calendar.
    This will be covered in specific posts.

  3. Add calendar
    This allows you to link a 3rd party calendar to your account, eg. your Outlook, iOS or similar.
    image

  4. Export Calendar
    This allows you to export your calendar in Intervals.icu to another 3rd party calendar.
    image

1 Like

Section 8
Upload

Clicking on the Upload button allows you to upload any activity to your account.
image

Drag and Drop, or click to select a file from your computer’s folder(s).

1 Like

Section 9
Option to go to a specific date.

image
Click on the grey block, eg. AUG 29, it will open up the next 2 weeks on your calendar.
On the calendar, the past is below the current week, while the future is above. There have been requests to swap this around, similar to other apps, but it’s currently hard-coded as current.

Repeated clicks on the date bar, will open up the next 2 weeks on each click.

1 Like

Section 10
Notes section

If notes are loaded for 2 or more days, they will appear above the week, eg. Base3 (red) and Test note (green) appear in week 32.
This applies to Notes, Holidays, Sick, Injured and can be custom coloured for easy identification.

Clicking on the note allows you to delete, mark done, edit or simply close the notes.

1 Like

Section 11
Weekly totals

This section can be viewed across the top of week, or to the left.
Change this in the Options menu (section 7) by ticking the option Show weekly total on top depending on your preference to view information on screen.
image

What can be viewed in this section? From left to right:


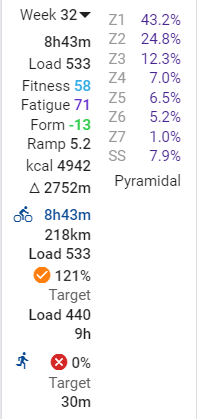
This is the view when Show weekly total on top is selected

  1. Week dates, Monday to Sunday
  2. Week number
  3. Total Training Load
  4. Fitness
  5. Fatigue
  6. Form
  7. Ramp rate
  8. kcal for the total workouts
  9. Elevation gain
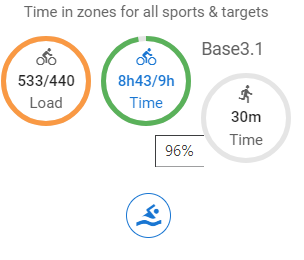
    10a. Biking specific target load, duration, distance and %compliance
    10b. Running specific target load, duration, distance and %compliance
    10c. Swim specific target load, duration, distance and %compliance
  10. Training Intensity Distribution, eg. Polarised, Pyramidal, Threshold, HIIT, Base or Unique.
  11. Time in zone distribution (power or HR, depending on your selected option in the calendar).

image
This is the view when Show weekly totals on top is not selected.

Clicking on the weekly summary, the following view is shown with additional options and information:

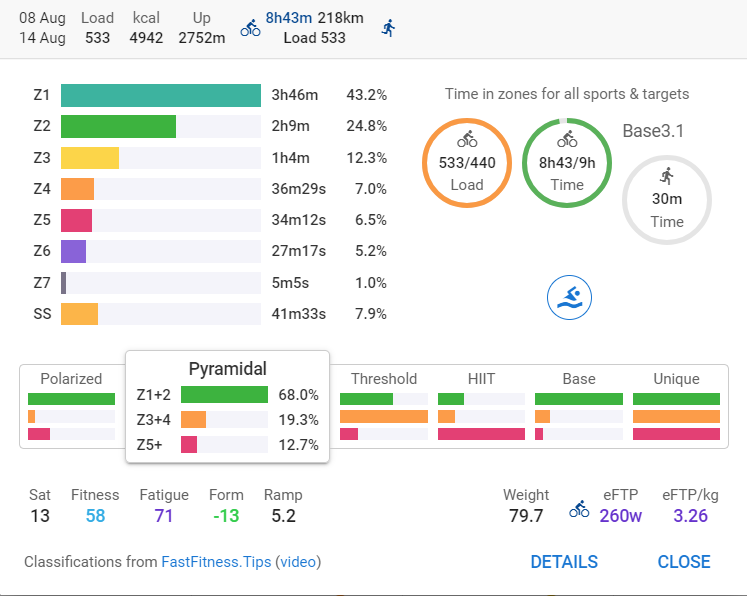
  1. Graphical view of time in zone
  2. Training Intensity Distribution (the type is slightly bigger)
  3. Summary information below (Fitness, Fatigue, Form, Ramp Rate, Weight, eFTP and FTP/Kg
  4. Options to add Planned data for Biking, Running and Swimming (top right).

Clicking on Biking will allow the following options:
image
image
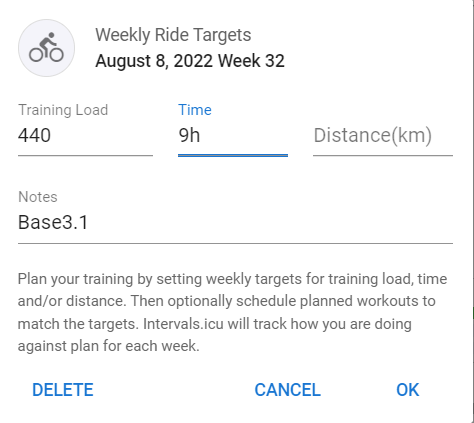
For week 32, you can add the planned Training Load, Time or Distance as well as a note.
Your progress against the plan will be viewed in the weekly summary, eg. 121%

1 Like

Section 12
Wellness & Weather information
This section will only cover Wellness information. The weather information is discussed in section 15.

The information appears in order, from top to bottom, as follows:

  • Date
  • Weather information (today + the next 13 days in the future).
  • Wellness information
    • Sleep data, Weight and Hydration
    • HRV data
    • Subjective feeling, eg. Soreness, Fatigue, Stress, Motivation and Injury.

1. WELLNESS INFORMATION
Clicking on the date will allow you to add an entry. Besides workouts and activity data, you can also add Wellness Data
image

Here you can add (left to right, top down):

  • Weight and kCal Consumed
  • Resting HR and Sleep duration
  • Sleep Score and Average Sleeping HR
  • SpO2 (Oxygen Saturation) and HRV (rMSSD)
  • HRV (SDNN) and Readiness score
  • Baevsky SI and Systolic blood pressure reading
  • Diastolic blood pressure reading and Blood Glucose level (mmol/L)
  • Lactate (mmol/L) and Hydration (L)
  • Body Fat % and Abdomen (cm), aka the waist circumference
  • VO2max score

Below that, you have the 1-4 rating for the following:

  • Sleep Quality
  • Soreness (Pre-training)
  • Fatigue (Pre-training)
  • Stress
  • Mood
  • Motiviation
  • Injury
  • Hydration

Lastly, a space for comments

image
Fields is a dropdown menu that allows you to select what information you want to see on the activities page. Simply tick/untick the options

OK & NEXT will take you to the next day’s entry, so you don’t need to close, go to the next day and open the menu again.

CANCEL simply closes the page without saving

OK saves and closes.

2. DISPLAYING THE INFORMATION
image
On the calendar page, for one day, it can show you the summary information in graphic/numerical form at the top of the day’s entry.

  • Date: Mon 15 Aug
  • Sleep duration: 7h58m
  • Sleep Score: 5
  • Sleep Quality: Q3
  • Hydration: Ok (Hydrated)
  • Weight: 80Kg
  • Resting HR: 44
  • Readiness: 9.2
  • HRV rMSSD: 111ms
  • HRV SDNN: 115ms
  • Mood: Good (the black smiley)
  • Soreness: 1 (low)
  • Fatigue: 3 (high)
  • Stress: 2 (average)
  • Motivation (to train today): 2 (high)
  • Injury: 1 (none)

Most of this data comes from the HRV4Training app that I use every morning.
More information about HRV can be found here.

If this data is missing, it’s not completed, or the upload from HRV4TRaining via Dropbox hasn’t been done. Not all the scores are completed in HRV4Training, eg. Weight, Stress, Mood, Injury and Hydration. This could come from other sources, or simply completed on the Wellness pop-up (section 12).

Section 13
Planned and Actual Ride data

This section view will change depending on the setting you have chosen in OPTIONS (section 7).
The default view (for me) is Compact, and if I want more information I will click on the workout to see the more detailed view.

So let’s look at one day, and the information you can see:
image

RIDE SUMMARY - with colour bar
The next section shows the ride plan, as well as ride data (if completed). It could also be blank, or it could show notes. Below represents a ride with a paired workout:
image
This will change depending on the view selected, eg. Normal, Compact and Minimal
image

image
The icon shows the activity type, eg. Run, Ride, Strength, Swim, etc.
Duration is next, in hours and minutes.
Distance is the on the right side of the colour bar.

The colours can be changed in OPTIONS (Section 7), as follows:
image

Options available or custom colour, based on intensity, RPE or Load.
There are custom settings options for Intensity and Load, whereas RPE is set at 1-10 only.
Further options allow you to tick (show) or untick (hide) the following options:

  • Ignore workout colours will use the default colour for the activity (see section 2&3 above).
  • Average Heart Rate & Intensity
  • Normalised Watts and RPE (Rate of Perceived Exertion)
  • Pace and Feel
  • GAP (grade adjusted pace) and Name (of workout)
  • Load and Intervals
  • Weight lifted and Description (of workout)

DEFAULTS returns the settings to the normal, i.e. no colour based on Intensity, RPE nor Load.
CANCEL closes and doesn’t save
OK closes and saves your changes

3. RIDE DATA
Clicking on the ride data opens the workout summary view, which will be covered in Section 16, below.

image
Depending on the view selected, you will see less/more information. In the Normal view, you will see:

  • Average HR: 146bpm, and Normalised Power: 242W
  • Load: 85
  • Intensity: 92%, RPE score: 10 and Feel: Smiley/Grumpy face
  • Intervals detected: 10s 402W and 30x 18s 485W
  • Activity Name: Evening Ride ~
  • Notes in the description: #3x10x20/40s AC sprints
  • Source file: Garmin Connect, Strava, Polar, Upload, etc.
  • Compliance to plan: 80%
    * Green tick: less than 20% above/below the planned load
    * Orange tick: 20-50% above/below the planned load
    * Red tick: greater than 50% above/below the planned load
  • Workout graphic, if you had a detailed workout, using the Workout Builder.

Section 14
Notes, and/or planned workouts with no completed workout

Occasionally, one would miss a workout and it would show the 0% compliance.
Notes made, as also showing in this section below the Weather, Wellness and Ride data.
image

Example of a Note for “A Planned Rest Day”.
Notes for a single day will be displayed under the workout, while Notes spanning 2 or more days will be displayed above the daily calendar entries (covered in section 10, above).

Section 15
Weather Information

Clicking on the weather information opens up a summary of the weather information for your chosen place. It is possible to have more than one location set, but does add more data to the day entry.
image

Other settings
image
Wind Speed can be set to:

  • mps (meters per second)
  • knots
  • km/h (kilometers per hour)
  • mph (miles per hour)
  • Bft (Beaufort Scale, 1-16)

Rain can be set to:

  • mm (millimeters)
  • in (inches)

Under OPTIONS (section 7) you can setup the weather for your preferred destinations.
image

Click on OPTIONS > Weather it will open this pop-up view:
image

  • Add Forecast allows you to browse for a location using the following options:
    image
  • City (if known, it will prompt with the known city names)
  • Label (you can customise this to suit your preference)
  • Geographic co-ordinates, i.e. Latitude and Longitude (a Google search can assist with these numbers)

Examples of City names, with one or more options:
image
image
image

More than one destination can be saved, then you can tick/untick locations based on when you’re travelling.

Section 16
Workout Builder basics

There is a thread dedicated to the Workout Builder, but has a lot of comments in-between the vital information. This section will touch briefly on the basics:
Before starting, let’s understand what is displayed once the workout is ready to be saved.

  • Category: Chose from Workout, Manual Activity, A-B-C Race.
  • Name: 4x8m VO2 Max, can be anything you want** - this is a mandatory field.
  • Colour: Red default is red, but you can select from a list of colours.
  • Date: 19 Aug 2022, today’s date, or select a date if you’re working on another workout.
  • Time: 06:00, useful when doing more than more than one workout per day**.
  • Duration: 1h44m, an optional field; can be calculated if using the description field below**.
  • Load: 123, an optional field; can be calculated if using the description field below**.
  • Description: Custom text, duration, intensity, cadence, etc will show in the graphic at the bottom of the pop-up menu
  • Time in Zone (TIZ): if Power/HR and Duration is used, it will show the TIZ to the right:
    • Z1: 32m (30.8%)
    • Z2: 40m (38.5%)
    • Z5: 32m (30.8%)
  • Intensity: 84% (complex formula used to calculate this number).
  • Normalised: 221W, is the planned Normalised Power for the workout**
  • Average: 189W, is the planned Average Power for the workout**
  • Variability: 1.16, is the planned Variability (NP/AP) for the workout**
  • Work: 1181kJ, is the amount of total work done (1kJ = 1000Ws).
  • Work>FTP: 553kJ, is the amount of work done above the set FTP.

Click on the day for the chosen activity, then select the workout type, eg. Run, Ride, Swim, etc.

HEADER SECTION
Enter the workout description, eg. 4x8m threshold
The colour can change based on your preference.
The date can be changed if you clicked on the wrong day when adding the entry.
An optional time can be used
Type: Ride, Run, Virtual Ride, Swim, etc.z
Duration and Load can be entered here, if known, or the steps in the next section can calculate it for you.

WORKOUT SECTION
There are two ways to build a workout:

  1. Learning the code/lingo used
  2. Using the ADD STEP method

USING CODE
More information to follow soon…

1 Like

I’m struggling to see where to change the time in zones on the Calendar page to HR. Can anyone help? Many thanks!

In settings, you set the priority to determine load. Based on that selection, the TIZ in the summary will show.

1 Like

Awesome! Many thanks for coming back to me so soon.

1 Like

[quote=“discobot, post:13, topic:36368”]
discobot
[/quote

@discobot

Hi! To find out what I can do, say @discobot display help.

@discobot display help

I currently know how to do the following things:

@discobot start {name-of-tutorial}

Starts an interactive tutorial just for you, in a personal message. {name-of-tutorial} can be one of: tutorial, advanced tutorial.

@discobot roll 2d6

:game_die: 3, 6

@discobot quote

:left_speech_bubble: Talk doesn’t cook rice. — Chinese Proverb

@discobot fortune

:crystal_ball: You may rely on it

Hi,

How do you exit columns mode on mobile site? Appears to be no way?

1 Like

You mean switching from list view to calendar view?
On most phones, you need to rotate the phone to get landscape view. Then the icons will show.
It´s a space issue.